The Ultimate Guide to Decadent Chocolate Cherry Ice Cream: Swirl, Chunk & Beyond
Few flavor combinations capture the essence of pure indulgence quite like chocolate and cherry. The rich, velvety bitterness of chocolate dancing with the bright, tangy sweetness of ripe cherries creates a symphony for the senses. While often associated with a classic dessert, transforming this pairing into a luscious homemade ice cream elevates it to an art form. Imagine a creamy, cool spoonful where pockets of intense chocolate meet bursts of juicy cherry – that’s the magic of a homemade chocolate cherry ice cream recipe. Whether you dream of elegant swirls or satisfying chunks, crafting this frozen delight at home is an immensely rewarding experience that promises to impress.
This comprehensive guide will walk you through the journey of creating exquisite chocolate cherry ice cream, exploring both the beloved "swirl" and the delightful "chunk" variations, along with expert tips, tricks, and insights to ensure your homemade batch is nothing short of perfection. Prepare to transform simple ingredients into an unforgettable dessert that will have everyone clamoring for more.
The Irresistible Allure of Chocolate Cherry: Why This Pairing Works
What is it about chocolate and cherries that makes them such an iconic duo? It’s a masterful balance of contrasting flavors and textures. Cherries, with their vibrant acidity and natural sweetness, cut through the richness of chocolate, providing a refreshing counterpoint. Depending on the variety, cherries can range from tart (like Montmorency) to super sweet (like Bing), offering versatility in how they complement the cocoa notes. Dark chocolate, in particular, harmonizes beautifully with cherries, its deeper, more complex profile enhancing the fruit’s natural sugars without overpowering them.
Beyond taste, there's a textural interplay. The smooth, melt-in-your-mouth quality of ice cream provides the perfect canvas for the soft, yielding texture of cooked cherries or the delightful bite of chocolate chunks. This harmonious blend makes any chocolate cherry ice cream recipe a truly memorable dessert, perfect for any season or celebration.
Crafting the Perfect Chocolate Cherry Swirl Ice Cream
The "swirl" variation of chocolate cherry ice cream recipe is a visual masterpiece, promising a delightful ribbon of both flavors in every scoop. It’s elegant, comforting, and surprisingly easy to achieve with a few key steps.
Ingredients for Your Decadent Swirl
- 2 cups heavy cream (aim for at least 36% fat for ultimate creaminess)
- 1 cup whole milk
- ¾ cup granulated sugar
- 1 teaspoon pure vanilla extract
- 1 cup fresh or frozen pitted cherries, roughly chopped
- ½ cup semi-sweet chocolate chips (or finely chopped chocolate bar)
- 2 tablespoons sugar (for the cherries)
- 2 tablespoons water (for the cherry sauce)
Step-by-Step Swirl Mastery
- Prepare Your Enchanting Cherry Sauce: In a small saucepan, combine the chopped cherries, 2 tablespoons of sugar, and 2 tablespoons of water. Heat over medium-low heat, stirring occasionally. The goal here isn't just to cook the cherries, but to gently coax out their juices and create a luscious, syrupy consistency. This process usually takes about 8-12 minutes. The cherries should soften and break down slightly, forming a beautiful, vibrant sauce. For an extra layer of flavor, consider adding a splash of kirsch (cherry brandy) or almond extract after removing from heat. Allow the sauce to cool completely; chilling it in the fridge will help it maintain its swirl integrity later.
- Whip Up Your Silky Ice Cream Base: In a large mixing bowl, whisk together the heavy cream, whole milk, ¾ cup granulated sugar, and vanilla extract. Whisk until the sugar is fully dissolved and the mixture is well combined. For the creamiest results, ensure your base is thoroughly chilled before churning – ideally, refrigerate it for at least 2-4 hours, or even overnight. A cold base churns faster and produces smaller ice crystals, leading to a smoother texture.
- Melt the Magnificent Chocolate: In a microwave-safe bowl, melt your chocolate chips. Do this in short 20-second bursts, stirring diligently after each interval, until the chocolate is smooth and perfectly melted. Be careful not to overheat it, as this can cause it to seize. Alternatively, you can use a double boiler for a more controlled melting process.
- Churn and Swirl to Perfection: Pour your chilled ice cream base into your ice cream maker and churn according to the manufacturer’s instructions. This typically takes 20-30 minutes, resulting in soft-serve consistency. During the last 5-10 minutes of churning, or just as the ice cream begins to firm up, slowly drizzle in the melted chocolate and then spoon in dollops of the cooled cherry sauce. Don't mix it in completely; you want distinct ribbons. A final swirl with a knife or spatula can help create those beautiful marbled patterns.
- The Final Freeze: Gently transfer the swirled ice cream into an airtight container. Press a piece of parchment paper or plastic wrap directly onto the surface of the ice cream to prevent ice crystal formation. Freeze for at least 4-6 hours, or until firm, for optimal scooping consistency.
For more detailed insights on mastering this method, check out our guide on Easy Homemade Chocolate Cherry Swirl Ice Cream Recipe.
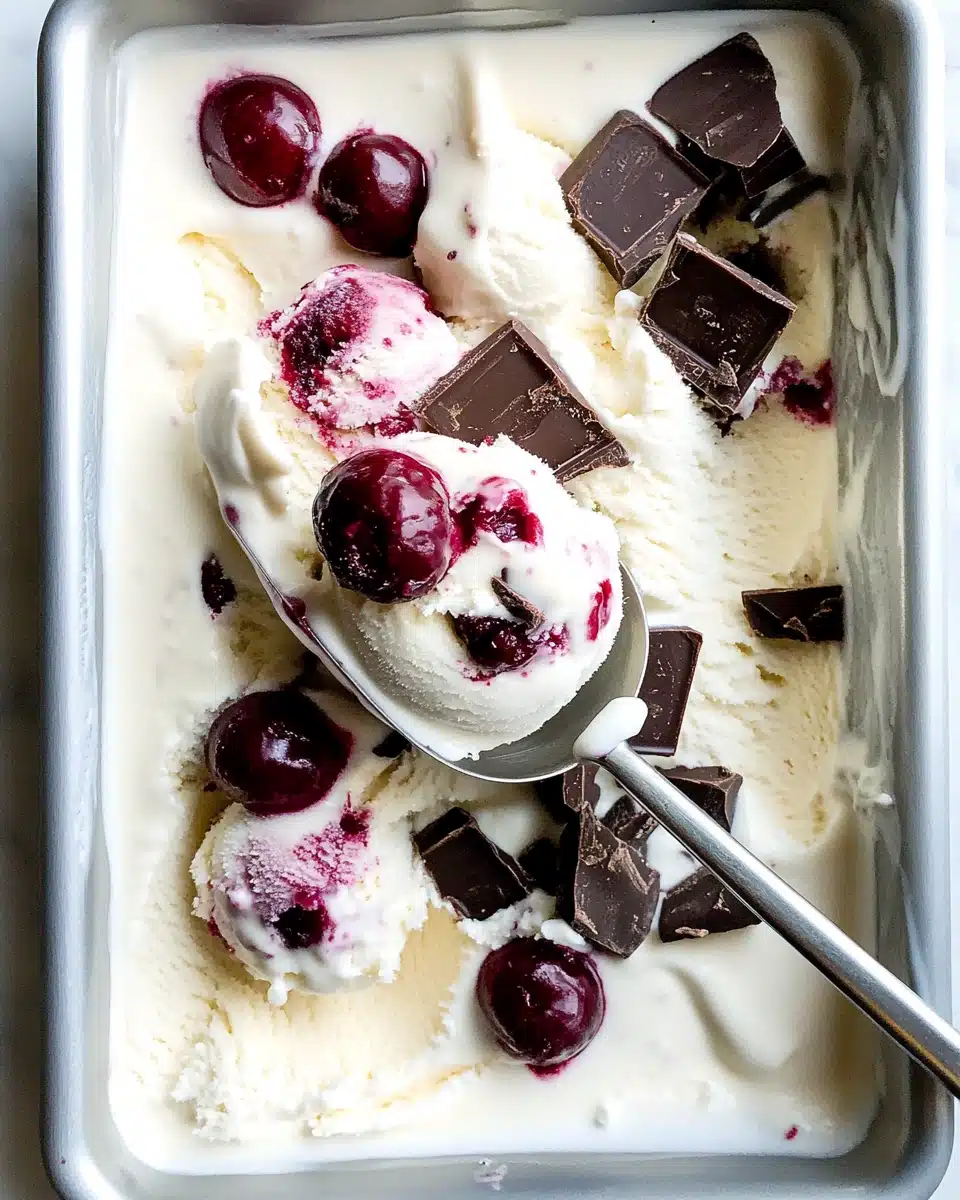
Embracing the Delightful Cherry Chocolate Chunk Ice Cream
If you prefer a more textural experience, where every bite delivers a satisfying surprise, the "chunk" version of chocolate cherry ice cream recipe is for you. This rendition focuses on generous pieces of chocolate and succulent cherries integrated throughout a rich, creamy base.
Ingredients for Your Chunky Creation
- 2 cups heavy cream
- 1 cup whole milk
- ¾ cup granulated sugar
- 1 teaspoon pure vanilla extract
- 1 cup fresh or frozen cherries, pitted and halved (or quartered for smaller bites)
- 1 cup semi-sweet chocolate chunks (or a high-quality chocolate bar roughly chopped)
- 2 tablespoons cherry juice or cherry liqueur (optional, for macerating cherries)
Crafting Your Chunky Masterpiece
- Prepare and Macerate the Cherries: Pit your cherries carefully – a cherry pitter is a worthwhile investment here! Halve or quarter them depending on your desired chunk size. In a bowl, gently toss the prepared cherries with cherry juice or liqueur (such as Kirsch or Amaretto, if using). Allowing them to macerate for 15-30 minutes enhances their flavor and creates a slight syrup, preventing them from freezing too hard in the ice cream.
- Build the Creamy Ice Cream Base: As with the swirl recipe, whisk together the heavy cream, whole milk, granulated sugar, and vanilla extract until the sugar is completely dissolved. Chill this base thoroughly in the refrigerator for at least 2-4 hours.
- Choose Your Chocolate Chunks: While store-bought chocolate chunks are convenient, chopping a good quality chocolate bar yourself can yield more irregular, artisanal pieces that melt beautifully in your mouth. Dark chocolate (60-70% cocoa) works wonderfully here, providing a delightful contrast to the cherries.
- Churn and Incorporate the Chunks: Pour the chilled ice cream base into your ice cream maker and churn according to the manufacturer's instructions until it reaches a soft-serve consistency. During the last 5 minutes of churning, add your macerated cherries (draining any excess liquid if necessary) and the chocolate chunks. The churning action will distribute them evenly throughout the ice cream.
- Set for Perfection: Transfer the chunky ice cream to an airtight container. Again, press plastic wrap directly onto the surface. Freeze for at least 4-6 hours to allow it to firm up properly.
Beyond the Basic Recipe: Tips, Variations, and Serving Suggestions
While the swirl and chunk methods are fantastic starting points, there's a world of customization awaiting your homemade chocolate cherry ice cream recipe.
Expert Tips for Ice Cream Excellence:
- Ingredient Quality is Key: Use the best quality heavy cream, whole milk, and chocolate you can find. Pure vanilla extract makes a noticeable difference.
- Chill, Chill, Chill: A well-chilled ice cream base is crucial for creamy results. The colder your base, the faster it churns, leading to smaller ice crystals and a smoother texture.
- Don't Overfill Your Machine: Always leave room for the ice cream to expand as it churns.
- Prevent Freezer Burn: An airtight container and pressing plastic wrap directly onto the surface are essential for keeping your ice cream fresh and free from ice crystals during storage.
- Roast Your Cherries: For an intensely deep cherry flavor, try roasting your pitted cherries with a little sugar before making the sauce or adding them as chunks. This concentrates their sweetness and adds a caramelized note.
Creative Variations to Explore:
- No-Churn Option: For those without an ice cream maker, you can create a delicious no-churn version by folding your prepared cherry sauce and melted chocolate/chunks into whipped heavy cream and sweetened condensed milk. Freeze as directed.
- Spice it Up: A pinch of cinnamon, nutmeg, or even a tiny amount of cayenne pepper can add an unexpected depth to your chocolate cherry combination. Almond extract also pairs beautifully with cherries.
- Chocolate Base: Instead of swirling chocolate, make a chocolate ice cream base by whisking cocoa powder into your milk and cream mixture.
- Nutty Additions: Toasted almonds, pecans, or walnuts can add a delightful crunch.
- Liqueur Boost: A tablespoon of cherry liqueur, Amaretto, or even a good bourbon can elevate the flavor profile of both the cherries and the chocolate.
Serving Suggestions:
Your homemade chocolate cherry ice cream is a star on its own, but it also shines with a few accompaniments:
- Classic Scoop: Simply enjoy it in a bowl or cone.
- Warm Brownie à la Mode: Serve a scoop over a warm, gooey chocolate brownie.
- Cherry Pie Enhancement: A perfect topping for a slice of warm cherry pie.
- Whipped Cream & Shavings: Garnish with a dollop of fresh whipped cream and a few chocolate shavings or a whole fresh cherry.
For more detailed guidance on refining your technique and exploring various ingredient combinations, don't miss our comprehensive Craft the Best Chocolate Cherry Ice Cream: Recipe Guide.
Conclusion: Your Homemade Scoop of Heaven
Creating your own decadent chocolate cherry ice cream recipe at home is a culinary adventure that promises rich rewards. From the initial preparation of fresh, vibrant cherries to the final, satisfying scoop, each step contributes to a dessert that is far superior to anything you’d buy from a store. Whether you prefer the artistic ribbons of a swirl or the hearty bite of chocolate chunks, this beloved flavor combination is a testament to the simple pleasures of good food. So, gather your ingredients, fire up your ice cream maker, and prepare to delight your taste buds with a truly unforgettable frozen treat. Enjoy the process, savor the flavors, and share the joy of homemade goodness!
This was one of the very best ice creams I made in the first few years when I first started making homemade ice cream, and it has been in my ice cream-making rotation for almost ten years now. Now that cherries are finally in season, it's the perfect time to make it again! Creamy, rich, chocolate cherry ice cream studded with bits of roasted cherries is a dream come true for anyone who loves both fresh sweet cherries and chocolate. The homemade ice cream base is smooth and creamy, providing the perfect backdrop for the rich chocolate and fruity cherry flavors. Every spoonful is a delightful mix of flavors, making it hard to resist going for just one more scoop.
